
Hey girls!
Welcome to Beauties On Fire, Week 1. Our collab focus this week is Classic Beauty, and I don’t know about you, but that makes me think of the retro timeless makeup and of course: that red lip. But between browsing reddit and obsessing over makeup sites and comments, I’ve noticed something lately: a lot of girls are hesitant to go bold. It might be that you don’t know how to find colors that flatter you, or it might be that you’re scared of the mess, or you just don’t know where to start and how to get used to the way your face looks when your lips are the focus rather than the eyes. That was the boat I was in last year, and I changed my focus to even rock a brilliant Jeffree Star Jawbreaker Blue. Much like a well groomed brow, a perfect bold lip can instantly make you look put together.
So today? We’re gonna go bold, walk through the steps to creating a gorgeous, flawless, featherless lip to last all damn day, and choosing YOUR perfect shade of red. I’ll even throw in a few tips for my hesitant friends who are a little skeptical about the bold look.

Prepping Your Lips For All Day Bold Lipstick
(and fixing the smudges you make in the process)
Pre-Prep: Scrub your lips!
How? You can use a dry toothbrush, or a spare one with olive oil, for the most gentle scrub if you don’t own a lip scrub, or if your lips are a little less sensitive, you can use sugar and lemon mixed into a paste for a super quick scrub. Please be careful using sugar on your skin, as some shards can actually be very sharp and leave tiny microfractures in your skin and leave you vulnerable to infection or sudden stinging. Sugar exfoliates the same way a brush will, and the lemon helps to refresh and re-juvinate skin.
Why? You should do this regularly anyway because it removes the dead or dried skin gently, and will help keep those annoying issues like crumbling lipstick and lipstick that seems to seep enhance the lines and texture of your lips. Doing it TOO harshly or TOO often can make your lips very sensitive, so be aware just as you are of the rest of your skin and body of how often it needs a scrub, vs when you need to let it rest.
Prime & Conceal (or one or the other)
 How? You can purchase a lip primer, or in a pinch – use a face primer. I did not use a primer for this tutorial because I wasn’t keeping my makeup on long. After the primer (or if you choose to skip it), use some of your concealer to neutralize the color of your lips. Blend it in well and make sure it’s not ‘wet’.
Why? Primer will help your lipstick both go on smoother, and last longer. It can fill in the little lines of your lips or even plump them, depending on the primer you get. Concealer will neutralize the color of your lips and help you get an even brighter and bolder look, as well as help you a bit with cleaner lines and give you a little more flexibility for over- or under-lining your lips. Foundation isn’t quite the same, but can also be layered if it’s long lasting.
How To Line Your Lips: Perfectly, Every Time!
Have I told you I’m not a beauty guru? Well I’m not, and I don’t listen, I try a thousand things on my own and on various tutorials and come up with what works, for me? That’s NOT matching my liner. Instead, I use something a few shades darker than my natural lip color? Because it makes my lips look 3D, just short of the inner tube lip look.
Why do we line our lips in general? Because lipsticks, basically every formulation, will have a tendency to feather. Some easily, some after it’s hot – whatever, it’s better to be safe than Joker.

How? Start with the top lip. We’re gonna make an X. Starting at the top of one side of your cupids bow (that cute as hell little double peak part), follow the line down and continue, making a slash that goes all the way down the lip. Then repeat on the other side, obviously crossing the two. IF YOU WANT TO OVERLINE, extend JUST past the top of your cupids bow, like, pencil not leaving the shape, JUST, and ONLY over-line your cupids bow, then follow the sides down normally after your X is completed. This looks more believable and flattering.
Why? This is one of the truest ways to get the line of your lips to not be shaky, and it helps them to be even. Once you have the top line, you can then go down along the sides and trace the gentle shape. Personally? I always do my top X, and then my bottom lip, and come back to the top.
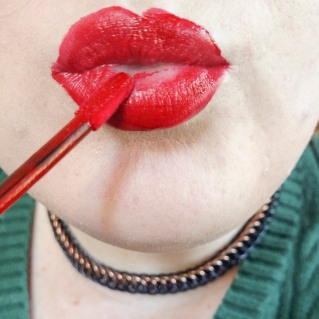
How to Make Your Lower Lip To Look Bigger
I did this in the photo above. It’s pretty simple, and you can see the effect it had compared to my concealed lips.
How? Starting at one corner, I followed down the curve of my lip, but at the bottom, I let the liner go Just slightly below my lip, actually still touching the coloring of my lips, but extending into the shadow.
Why? If you have thinner lips, or average – but you’re wearing a bold color, the sudden attractant to them in color and intensity can make them appear smaller, or more noticably smaller. By very slightly over-lining your lower lip, you can create a sort of 3D effect by playing with shadows – this works especially well with a darker shade if you’re doing it under a stronger lip, but you can do it with a shade that is slightly darker than your lipstick as well, or do it with a pencil matching your lips under a gloss or MLBB nude shade.
How To Make Your Lower Lip Smaller or Poutier
 Why? Believe it or not, there’s people out there that want to make their lower lip look smaller too, I believe the most common thinking behind this desire is to balance out a thin-in-comparison top lip, without severely overlining, or for people that have larger lips compared to the rest of their face, since just as if your lips are on the smaller side, this will emphasize that, being on the larger side lip wise can make them stand out and be TOO bold, and that shouldn’t limit your colors!
How? Either leave the very outer rim of your lips concealed and unlined, and bring the liner in just a bit on all edges of the lower lip, or you can do what I did and thicken the liner up towards the middle of my lip, which can make the lip volume feel more centered and look poutier (that should be a word) due to the illusion of shifting the fullness upwards.
This works because light or bright areas look more prominent, while darker or more muted areas look further back and shadowed.
How To Apply Bold Lipstick

Can we talk about how satisfying that first sweep of color is? No really though. I love seeing the color change go across my lips, maybe that’s just me. Especially since I found MY red. I’ll show you how to find yours too! If you’re too impatient and you don’t think the rest of my little guide will help you, feel free to scroll down until you reach your goal, my lovelies!
MY red is Cherry red. NYX Liquid Suede in Kitten Heels, if you were wondering.
I highly prefer liquid lipsticks for my bold colors, because they dry down and stay far longer and better than bullets. My favorites are NYX and Jeffree Star – and for well hydrated lips, ColourPop too!
IF you are following along with a bullet lipstick, I highly recommend a lip brush for application, but this will also work with the bullet itself.
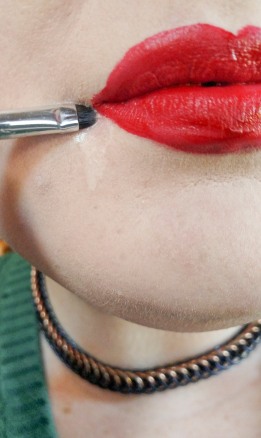
I always apply one sweep of color across the center of my lower lip, FIRST.
 Oh look, here’s a super awkward looking picture of my next step.
Let’s fill in the lines! Or is this more like connect the dots? I really don’t know.
When I’m using anything with a doe-foot applicator, or anything with a brush, after the center sweep of color, I go right for the edges, and slowly (don’t rush this sh*t! ~ nah, I got your back, I’ll show you how to clean it up too!) pull it down along the edge of my lip to the center. Then reload with color and repeat with the other corner down the center.
 Why? The applicator glides MUCH easier when it has plenty of color. Until you’ve got it down perfect (I don’t!!!), I really recommend re-loading that brush. There may be a little gap in the center of your pout still, or you may notice little glumpy bits globbed together, go ahead and smooth everything out with another sweep so it blends into one layer before it starts to dry down.
 (See, messy corner! We’ll clean it up. Almost there!)
For the top, the only trick I’ve found that truly works for me for my cupids bow, is following the X. Lay the applicator across the line to the tip of our bow, then glide down to fill it in. Re-dip again and repeat on the other side. If you aren’t comfortable working at this angle, you can ‘stamp’ the color along the cupids bow in this position, and then apply however you’re comfortable.
 Again, make sure everything is smooth and blended. Touch up if needed while it’s still wet, we’re only going to do one final touch up of the actual lipstick.
(I would love to claim I was a little messy on top on purpose, but I was actually really tired, oh well, still works for you guys to see my fix-all for lipstick, even ones that stain… like red)
Do. Not. Rub. Your. Lips. Together.
Why? The bottom layer is starting to dry, and now the top will be. If you rub your lips together, OR if you start applying more layers after this. Ideally? Keep your mouth open the way you’ve been looking like a doof applying it until it sets. Yes, we will feel silly. Yes, significant others might laugh.
 Trouble Shooting!

Lipstick won’t stick to the center of your pout? You can try gently drying just the center with a tissue or cloth, applying a primer (optional, I don’t do this because apparently, my primer tastes awful), and applying a little more of the lipstick. Unfortunately that’s not always enough… and it can lead to a crumbly feeling and the color wearing off the inside anyway… then your mouth feels Gross.
If you’re like me? That won’t be enough. You may need to apply a red stain under a red, berry, or dark lipstick, (I love Seraphine’s Vegan Berry Tint in Cherry Cream, though it’s $18, and I’m cheap, so TonyMoly also makes a very pretty stain called their TonyMoly Delight tint, and you can get it from Birchbox in the US for $6.00) or just accept that the inside of your mouth is infact the color that it’s always been and nobody is staring at it when they look at you, except you. (Pshhht. I’m using a stain)
The most mainstream solution to making your lipstick last is to go all out and line the entire lip with the color, but I don’t think that’s the lipstick lasting so much as the liner being visible after instead of your lip color. I don’t do this trick because I’m typically wearing an item to test it for myself or for review, and that would invalidate my tests.
Note: If you suffer from this a lot, and are going the red lip route, you can apply a stain directly with liner over or under it, and skip the concealing unless you are changing your lip shape. In my experience the stain works better directly on your lip than over a primer or concealer, though many stains also double as a gel blush, so experiment!
Unfortunately… a red stain really won’t help you with a bright blue or other extra-special lip color, so you’re a little more limited to the other two options, or finding a liner color that matches your bold and beautiful shade.
 CLEANUP!

So you saw my smudges? If you’ve never had them… share your secrets you magical unicorn you. I left them for this.
Please note, the way this will remove it the best, is if you let the lipstick dry, but we don’t always have time for that, and I do not have patience, so if you’re doing it with your lipstick wet: Don’t let your fingers touch it, Do wipe your brush clean every tiny itty bitty swipe, and Do use the little tippy part.
What you’ll need?
1) Micellar Water, (I used Marcelle, just because I had I had a sample) and 2) a concealer brush or other small flat brush. I used the elf concealer brush. ($1.00 at most Targets & Dollar Trees)
How? Dip the brush into a little pool of micellar water… flick off excess – or you’ll get drips, and use the edge of the bristles to swipe away little mistakes. This will remove foundation or concealer it touches, but that touch up is next. If you do NOT clean your brush between every tiny stroke, you risk getting a very amusing but not so wearable red smear on the very next stroke.
 Now that we’ve removed the mean uneven edges, it’s time to define them.
This might seem obvious, but… let the micellar water dry first. Patting it dry just won’t work at this point because it can smear your wet lipstick. But it’s a makeup remover. It’s not going to let you apply makeup next without a struggle!
Once it’s dry, (or you managed the tedious task of getting the excess off, proven by no shininess…) clean this brush or another concealer brush/precise brush, dip it in your concealer, wipe a bit off on the back of your hand so it’s about half dry, and gently pat/swipe along the edge of your lips everywhere that you removed makeup, blending it out into the rest of your makeup again. Again, clean the brush after each small section before reloading, because the tiniest bit of red can mess this up.
 See how the bottom is looking better already?
Repeat all the way around your lips until you’ve got your line back.

IF your concealer did not blend enough into the rest of your makeup: clean the brush, and blend it dry with small pulling motions away from your lip to spread it out. You can also dab the brush into some translucent powder and pat that gently onto the areas to set it, if you have oilier skin or a slicker, non-budge proof concealer.
IF you initially removed a bit too much lipstick: now is the time to load the tiniest bit onto a lip or concealer brush, no matter what formula or application you used, and touch up with a slow, thin line to fix where it was messed up and make it even. This is not the time to go thicker or bigger in the lips, because going over your liner will basically nullify why we applied it entirely. If you need to add more for some reason, it will really only work if you know for a fact your lipstick is build-able without clumping (think bullet) or you use a liner that matches your lipstick exactly.
The Not So Secret Tip To Making Your Lipstick Last All Day

What you’ll need:
1) A tissue or thin toilet paper, 2) translucent powder, and 3) a fluffy brush.
How? Place the tissue against your lipstick letting it gently dab but stay pressed, dip your brush in the powder, and apply the powder in back and forth motions THROUGH the tissue paper, over your lips.
 Why? This technique lets in just enough of the powder to mattify and set your lips. It can very slightly reduce boldness, which you might think is good or bad, but it significantly improves wear time.
The other option for mattifying all day power? Besides a liquid lipstick, which still isn’t a guarantee, (Liquid Suede doesn’t dry all the way down, and is more of a matte lip cream, so I do mattify it if I want it to last) is a product made to seal and matte out your lips. I’ve been dying to try Smashbox Insta-Matte, which sells for around $24 online.
Check out that matte & sleek as hell cherry red!
Ok girls, it’s that time, the long awaited…
How To Choose Your Perfect Red Lipstick
There’s two main things that affect how a lipstick will look on you, color wise (well, 3, but mostly 2). This is going to be a very, very basic guide on what shades of red to start looking at. Everyone’s skintone is different, and your personal taste for what you think looks good on yourself and others will vary from person to person, and even day to day depending on your mood and what you feel like clashes that day.
PLEASE note that lipsticks look vastly different on your arm than they do on your lips. The best way to swatch a lipstick is to put it on the pad of your finger, and hold it up to your mouth. The pads of your fingers are (on average) far more similar in pigment to your lips than your arm, especially if you’re on the light or dark end of the skin tone spectrum. Keep this in mind and keep in mind that if you do not go for a 100% opaque lipstick (does this even exist?) the color of your actual lips can change how it looks too.
1) Your Skintone
If you have very LIGHT SKIN, there is a chance that you look fabulous in a CHERRY RED, or a delicious DEEP BERRY, or a RED WINE tone. Darker berries and wines may start to look goth, which can look good – but less red. Blue based reds are your friend, especially if you’re cooler.
If you have MEDIUM LIGHT SKIN, you may look good in a PINKISH RED, a ROSE RED, or a sort of burgandy PINOT NOIR. True reds and rosy reds might be your love affair.
If you have MEDIUM SKIN, you may look good in a FIERY ORANGE-RED, but can also wear a true CHERRY RED and that PINOT NOIR. Reds tinged with orange, or brownish reds may make you shine. For teeth whitening, head for those true brown reds, over the orange undertones.
If you have MEDIUM DARK to DARK SKIN, you may look good in FIRE ENGINE or CANDY APPLE red, as well as OXBLOODS and PLUM REDS. This skin tone range has the most versatility, and is the most likely to be able to pull off colors from Every range, depending on undertones and personal taste.
2) Your Undertones
If you are cool toned, meaning you lean more pink in your coloring, or at least far from yellow (basically, if you try on a foundation, and it looks yellow? You’re probably cool toned) blue based lipsticks are going to look better on you on average, such as cherry red, or raspberry and cranberry hues. As a bonus, blue based lipsticks will make your teeth look whiter. Warmer orangey lipsticks can make your face look jarring, but you can try out some corals too.
If you are warm toned, meaning you lean a little more yellow to golden in your coloring, you typically will do better with more warm, yellow based lipsticks. You can typically pull off sharper colors because more richness and depth to your skin can compliment those tones, but lipsticks that lean too cool can make you look quite ashy, especially in medium to light skin tones.
If you are the not so known olive toned, orange based lipsticks such as a brick red can make your skin look brighter and refreshed and are super flattering.
If you’re neutral, you have both an easier and hard time, because a lot of cool and warm colors will flatter you, but they can also randomly clash. Experiment and have fun, and remember…
almost everyone can pull off a true, classic red.
How To START Wearing Bold Lipstick
Whether it’s red, blue, purple, or black, bold lipstick can be a little intimidating to see in the mirror. If you’re skeptical about trying it out, try one, or all, of these tips:
- Put it on just to wear around the house. Even half an hour. Just get used to seeing your reflection.
- Put it on to run a quick errand to get confident about wearing it out.
- Try stains, or using a bright lipstick, but dabbing it on with your finger to build the opacity to YOUR comfort.
- Remember that makeup should be fun, and as long as you’re not breaking a dress code, nobody’s opinion matters, AND… you’re probably going to get complimented. It’s not a bad thing.
- Mix a (LIP SAFE!!!!!!) eyeshadow or pigment into a bit of chapstick and create your own colors for quick testing. This way you can find your ideal shades of what you like, without spending big money until you KNOW what shades work for you.
- Layer! Take a more mild lipstick like a nude and layer it over a red, purple, brick, or even brown, to tone down the color and help you build up to it.
And the fastest, stunning look to pair with a bold red lip?
A simple eye with neutral colors, or even just mascara and a sleek wing. Maybe a hint of blush. You can always experiment, but this look can instantly bring out YOUR Classic Beauty.

I’m a cool to neutral, very light skin tone, my red is Cherry red, like my NYX Kitten Heels (middle), but I also love deeper brick reds such as ColourPop Avenue (right). My favorite bold lipsticks on my coloring are deep purples, vampy deep brown reds, and vibrant sky blue like Jeffree Star Jawkbreaker (left).
QUESTION OF THE WEEK!
What’s your coloring and what’s your MUST have red lip?
OR Let me know what tip you can’t live without, or will be trying soon!
![]()
Make sure to check out the other lovely #BeautiesOnFire gals.
You can find links to all posted blogs every week linked to our logo.
Hey! Let’s connect!
Instagram | Twitter | Facebook | Pinterest
also feel free to add me on Facebook as a friend 🙂

Oh my, wow.. Just, wow! This post is so packed with information, top notch information though! I’ve learned a couple of new things here, so thank you! You really went all out with this post, Sarra, and I’m still completely obsessed with the pictures of your lipstick application. My current must have red lip has to be the MAC Matte – Viva Glam, although admittedly that’s mostly because it’s the highest quality red lipstick that I own, in a very small collection! I really need to ponder the notion of expanding my lip products considering the huge love I have for them!
LikeLike
“Put it on just to wear around the house. Even half an hour. Just get used to seeing your reflection.” I absolutely agree with this! That’s what I did when I started. I started with a Revlon Kissable Lip Stain and just wandering around and catching a glimpse of your reflection here and there gets you used to seeing yourself with a bright, bold lip, and that makes all the difference 🙂
LikeLike
This is such an informative post!
skinnydecxflatte.blogspot.com xo
LikeLike
Wow! SO many useful tips to use red lipstick. I am such a noob… I only use lip liner and then apply the lipstick and that’s it.
LikeLiked by 1 person
Most of the time lately my makeup is just to play around and then take off to let my skin breathe since I’m at home anyway. So I’ve even been skipping the liner! 😉
LikeLiked by 1 person
I had to share this on my pinterest because this tutorial is SO amazing! I have been looking forever for reds that fit ME and I’ve found two reds that I like, but they aren’t perfect, this post helps me better think about my choices and I’m going to study and implant it in my mind for my next “Red” shopping trip! lol Thanks so much for doing this! I also LOVE that blue and dark vamp red on you, girl. Beautiful!!
LikeLiked by 1 person
Thank you so much! I was surprised I liked the blue. I got it discounted with a partial gift card to a store that no longer could sell JS besides selling out old stock. And I totally get not finding the right red. I had a bunch of little Wet N Wild reds that either the formula or the color was awful. Finally did my color research and found things that I love 😀 I’d love to see what you end up getting when you find THAT red that makes you feel like the bomb!! 😀
LikeLiked by 1 person
This is so so helpful! I didn’t know it would help to let the lipstick dry and then rub your lips. Thankyou!xo
LikeLiked by 1 person
So glad you found it helpful! Applying lipstick is like an endless maze to me where new problems crop up all the time with various formulas so I tried to get as many fixes in as possible 🙂
LikeLike
This is brilliant! Thanks for sharing your tips 🙂
LikeLiked by 1 person
Glad you like it! It’s been one of the funnest posts I’ve gotten to write up in a while! (:
LikeLiked by 1 person
I like how you outlined a bunch of tips 🙂 the outcome of course, gorgeous 🙂
LikeLike
Omg girl! So many tips all in one place! I don’t wear red lips a lot, mostly for special occasions, but it’s a great color to start off with when wearing bold colors. I love how you talked about all the steps to actually apply lipstick (truth be told I have no idea what to do with lip liner) and a color guide to different skin tones. Personally I like a true red and brick red.
LikeLiked by 1 person
Truth be told… I’m lazy as hell when it comes to lipstick if I’m not actually wearing it out for longer than a trip to the grocery store and back. My lip liner is sorely under-used! Those are my faves too! Brick red can look almost vampy and gorgeous and shine in it’s own special way 😀
LikeLiked by 1 person
Wow girl!!! This post is fantastic!!!! I totally need to line my lips more often!! I love all your tips and girl you slay that red lip!! Stunning!!! Someone call the fire department haha!!! But seriously, I love that red lip and all your tips! I totally experiment with bold lip colors at home!! I once used eyeliners on my lips for crazy lip colors haha!!
LikeLiked by 1 person
Dammit woman now you’re corrupting me. I’m gonna have to figure out something fun to do with eyeliners soon. I kept thinking of more lip fixes I had to google in the past year and boy did the post get long! Next week’s isn’t much shorter. I feel like I started a theme for myself!
LikeLiked by 1 person
Haha omgsh you totally should with eyeliner!! I love eyeliner so much and would love to learn all your tips!! Haha you go girl!!! I need to get on your level haha!
LikeLiked by 1 person
Very nicely done. Lots of wonderful detailed instructions.
LikeLiked by 1 person
Gorgeous color!!! I love rocking a red lip color!! Super helpful post!!! 😊
Tonee
https://infoellablog.wordpress.com
LikeLiked by 1 person
So glad you found it helpful! Every time I thought I was done, I had another ‘oh wait!’ tip I had to add in. Figuring out lipstick is like baking a souffle without a recipe.
LikeLike
You have some serious nice tips here!!!!! I loved the result and the color looks fantastic on you!!!
LikeLiked by 1 person
Thanks! NYX is the perfect mix of cheap and quality so when you add in the mattifying it fixed the only issues I had with it not drying down 100%. I tried to include every tip I’ve learned recently and I’m glad people are enjoying it and hopefully give everyone a take-away tip.
LikeLike
Wow, you really pull off the red lip! I feel it’s a bit too bold on me but sometimes I do like to try new things and go out of my comfort zone. Will definitely keep these tips in mind for next time! Thank you for sharing xo, sharon
http://www.stylelullaby.com
LikeLiked by 1 person
Aw thanks gorgeous! It still gives me a little start if I catch my reflection and forgot “oh! I wore a bold lip today!” Very disconcerting.
LikeLike
I looooove this post, so many handy tips all in one place!! I rarely wear a red lip, I’m much more of a pink girl 🙂
Jess xo
http://www.theindigohours.co.uk
LikeLiked by 1 person
I’ve Tried pink but can’t get used to it on me yet, I’ve been toning it down with coral. I’m so glad you found this helpful. I tried to pack it with the fixes I knew for every issue that almost had me throwing down the lipstick and backing away slowly!
LikeLike
Love this!!!! It really helps me!! ❤
LikeLiked by 1 person
Yay! I was worried I packed in too much 😀
LikeLiked by 1 person
Not at all!!! ❤
LikeLiked by 1 person
Oh my goodness…this post is so helpful! Thank you!!!
LikeLiked by 1 person
I’m so glad you found it useful! I wanted to pack in any tips I could think of so there’s at least one thing to help everyone 🙂
LikeLiked by 1 person